UberMuzik – An app you had been waiting for …


  • Have you ever spent quite some time searching for a track in your library? Didn’t you at that time think of an app that could play your music just by listening to your command.
  • Have you ever realised how big a problem finding new music is?
  • Do you get lost in all the complexities of new-age players which have everything you don’t need, yet nothing that you truly want?

If the answer to any of the question is YES, then there is a FREE app for you now –

UberMuzik

https://play.google.com/store/apps/details?id=muzic.coffeemug.com.muzic&hl=en

It’s small, syncs well with the songs on your phone and plays tracks with the minimal of fuss.

Also, you can search for a song using your voice, or even directly play one.

And most importantly, it analysis your playing style and recommends new songs to you which you can stream in the same app using minimal mobile/Wi-Fi data.

What are you waiting for? Give it a try, I’m sure you won’t ever go back.

Android Developer’s Guide to the Google Location Services API

Knowing your user’s location is useful information in many applications we develop and use today. There are a lot of popular location-based applications out there that are making our lives easier, as well as changing the way that we use these services. An example is the wildly popular application Foursquare, where users who frequent to an establishment and “check in” often win discounts. Uber, which helps you get a ride from your mobile phone at a lower rate than a normal taxi. The list is large and still growing.

Check out this great article from Toptal.com :

https://www.toptal.com/android/android-developers-guide-to-google-location-services-api

Using CursorLoader to fetch data from Android Database

A CursorLoader is a loader that queries the ContentResolver and returns a Cursor. This class implements the Loader protocol in a standard way for querying cursors, building on AsyncTaskLoader to perform the cursor query on a background thread so that it does not block the application’s UI.

  • First, create a database helper class that we will need to read data from. It is an inner class that extends SQLiteOpenHelper. Also initialise a few constants, variables and a ListView that we will use to show retrieved data.

Screen Shot 2015-04-21 at 1.01.05 pm

Database Helper Class

  • Make your activity implement LoaderManager.LoaderCallbacks<Cursor> and override the three methods – onCreateLoaderonLoadFinished and onLoaderReset. We will be dealing with only OnCreateLoader and onLoadFinished for now.
  • Initiate the LoaderManager inside Activity’s onCreate but writing this code – getLoaderManager().initLoader(1, null, this). This piece of code initialises the CursorLoader and when completed, evokes onCreateLoader. Also, fill the database with some dummy data and find the ListView that will be used to display results (all inside Activity’s OnCreate).

Screen Shot 2015-04-21 at 1.15.55 pm

  • You need to return a Loader<Cursor> object from onCreateLoader. For that we will be using the getData meth that we coded in our DatabaseHelper class.

Screen Shot 2015-04-21 at 1.06.04 pm

  • After a Loader<Cursor> object is successfully returned from onCreateLoader, onLoadFinished method will be evoked by the system. Here we will get the Cursor that we wished. We can retrieve the data from that Cursor object and prepare an ArrayAdapter object to display the results of our efforts.

Screen Shot 2015-04-21 at 1.10.46 pm

  • And so, it’s done ! You can view complete code down below.

CompleteCode

Android : Image in centre of white circular background

Result

Suppose you want to do something like this. Doing this by placing one image over another in a relative layout is easy. But the code might explode on different devices having different pixel densities. Also, what if you have to change the size of this entire view. In that case, for everything to work correctly, you will have to adjust the size of both the images and the padding as well. We should strive for some generic solution, right? And we will achieve that using a Custom View.

1. First of all, create a new Android Studio project (Or eclipse project if you are still stuck there).

2. Then, make a new class CustomLayout and make it extend RelativeLayout. Put the following code into it.  We will come to that later. You will notice that requires a mat_white_circle_demo.xml to inflate. Let’s create that file too.

CustomView Class

3. Create a new layout file mat_white_circle_demo.xml. Paste the following code into it.

Screen Shot 2015-04-03 at 1.11.11 pmAlso, mat_solid_white_circular.xml in drawable :

Screen Shot 2015-04-03 at 1.20.04 pm

This code creates a relative layout which has been given a special round shape with white background. In the middle of the layout is an ImageView which will house the image we wish to display inside the white circle. We inflate this view in our CustomView class.

Now, coming back to the code in CustomView class. In this class, we override the default constructor and inflate the above view. But before we do that, we extract whatever width and height the view is given in layout and give the relative layout a padding of 1/6th of that. This way the image always stays inside the relative layout, hence giving the view we wish to achieve.

3. In your activity’s layout file (activity_main.xml), add the following custom view using your_package_name.CustomView tag.

CustomView in XML4. In your MainActivity.xml, find the ImageView (image) and do whatever you wish to do with it. (y)

This code works with all pixel densities and for changing the size of the view, you just have to change the width and height of CustomView. The class takes care of all the other things for you to make sure that the image stays inside and in centre of white circle.

Save state of a running AsyncTask on device orientation change in Android

Imagine a scenario where you are starting an AsyncTask in the onCreate of an Activity and using it to update a progressBar. When you rotate the device, the Activity is recreated and onCreate is called again, hence the AsyncTask begins again. Meanwhile, when the previous AsyncTask finishes, its result is lost as the Activity it was associated with doesn’t exist anymore. To avoid such a situation, we should use a Fragment.

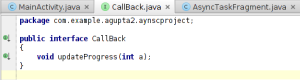
1) Create a CallBack Interface for passing data from Fragment to Activity.

One

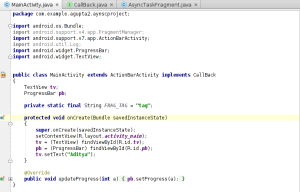
2) Create a new Activity and find the ProgressBar. Also implement CallBack interface and override the updateProgress method to update the ProgressBar.

two

3) Create a Fragment without a UI. Create an instance of CallBack interface and assign it the value of Activity received in the Fragment’s onAttach. This way, your Fragment keeps track of the most recent Activity object.

Also override the onCreate method and write setRetainInstance(true). This line is particularly important as it allows Fragment’s state will be retained across the configuration change. For a better understanding of setRetainInstance, go through this link – http://stackoverflow.com/questions/11182180/understanding-fragments-setretaininstanceboolean.

three

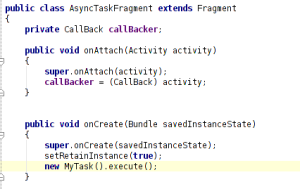
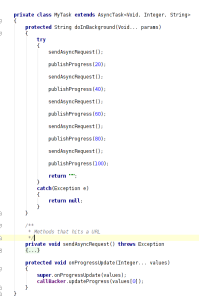
4) Create an AsyncTask in your Fragment’s onCreate and execute it. Do your background processing inside doInBackground method and also override the onProgressUpdate method to publish the progress update to your activity using the CallBack instance. For the sake of simplicity and showing progress updates smoothly, I am hitting the same URL five time and publishing progress in between successive calls.

four

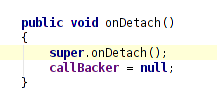
5) Also, don’t forget to put callBacker to null inside onDetach of the Fragment.

five

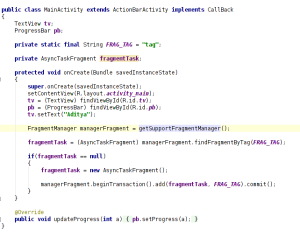
6) Now, come back to your MainActivity and create an instance of this Fragment. Hook it up with a TAG so that after configuration change, inside your Activity’s onCreate, you can check if the Fragment is still active using this TAG and take proper action.

For the first time, when we try to find a Frafment using the TAG, it will return null since no Fragment is active. In that case we add a new Fragment which in turn starts an AsyncTask. After device rotation, onCreate will be called again, but this time due to setRetainInstance being set to true, it will find the Fragment to be non-empty and not do anything.

Although onAttach of Fragment will be called and it will receive an instance of the newly created Activity. Hence it will send progress updates to the correct Activity.

six

Download code from here : 

https://www.dropbox.com/sh/4aurs87w507g3g0/AACtU3mLLKbHbbBL1PZAqcR1a?dl=0

Stopping outOfMemoryError on Orientation change in Android

Android, being a mobile operating system, has to work under tight space and memory constraints. Each application can get less than 16MB  of storage depending on the device. A common problem that occurs while displaying large Bitmaps is the much dreaded outOfMemoryError. It occurs when our app memory requirement exceeds the available VM budget. This blog post will teach you how to avoid that.

When device screen is rotated, an activity is completely destroyed and then recreated. If your activity displays a large bitmap, multiple rotations will result in bitmap decoding to occur multiple times, and if the image is quite large, might cause outOfMemoryError.

For our example here, we take a pretty large image, with width 3008 pixels and height 2000 pixels. For a mobile device with limited memory, it is a pretty huge image.

Lets put the image in the drawable folder and use it in our app.

Default_Set

Using the above code causes the app to crash due to outOfMemoryError on a Samsung Note 3 with 3 gigs of RAM. Let’s try something else.

Let’s first check if the image size is manageable or not. We can do this without loading the image in memory by setting the  inJustDecodeBounds flag to TRUE in BitmapFractory.options.

Checking_Image_Size

If the image size exceeds the adequate value, then we can apply sampling to the image and make it’s memory footprint smaller. As an example, an image with resolution 2048×1536 that is decoded with an inSampleSize of 4 produces a bitmap of approximately 512×384. Loading this into memory uses 0.75MB rather than 12MB for the full image. Do remember to set the inJustDecodeBounds flag to false since you now plan to load the image into memory.

Sampled_Image

Voila, and now the outOfMemoryError is gone !

All’s well up until now, lets try and rotate the screen a couple of time. And here it is – outOfMemoryError back again. Why is it happening now? – That is happening because we are creating Bitmaps. And whenever we rotate the device it will again create a new Bitmap without recycling the previous one( Since onCreate() is called when we rotate the device ).

A probable solution would be to store the bitmap in the Bundle that android provides us in onSaveInstanceState() and retrieve the bitmap from it in onCreate().

See below code screenshot :

CodeBase

Tracking device’s Cell Location Change in Android

In wireless telephony, a cell is the geographical area covered by a cellular telephone transmitter.

A mobile devices keeps changing its Cell in order to stay connected to the network provider. That is how you get uninterrupted network access wherever you go. Using PhoneStateListener class in Android, we can determine if user’s device switches Cell Tower.

[From official docs] PhoneStateListener is a listener class for monitoring changes in specific telephony states on the device, including service state, signal strength, message waiting indicator (voicemail), and others.

Note that access to some telephony information is permission-protected. Your application won’t receive updates for protected information unless it has the appropriate permissions declared in its manifest file.

  • Since detecting cell location change in Android requires some Location Tracking, add the following permission in your manifest : <uses-permission android:name=”android.permission.ACCESS_COARSE_LOCATION” />.
  • Create a class that extends PhoneStateListener and override the onCellLocationChanged method :

cell_location_changed

  • Get Android’s Telephony Manager System Service and set up a listener for getting Cell Tower Location changes. Pass it an object of the class extending PhoneStateListener that you created earlier.

Telephony Manager

  • Now, you’ll receive and CellLocation object whenever the user’s device switches Cell Tower. Using this object you can request a location update by calling requestLocationUpdate().

How to add an External Project as a Library to Android Studio?

Android Studio uses Gradle as a build tool. It offers multiple advantages over Ant and Maven. One of them is Improved Dependency Management.

Gradle in Android Studio lets you add more common library into your project just by writing a single line in build.gradle. These libraries are then picked from Maven or jCenter repository. For example Android Support Library can be added by simply adding  – compile ‘com.android.support:appcompat-v7:21.0.3’ inside the dependency tag in your build.gradle file. 

But what if you wish to add another project as a library into your Application. For that you will have to add that library project as a Module Dependency in your app.

  • Create a new Project in Android Studio.
  • Go to Project Structure. Go into the Modules list and click on plus sign. This will take you to a ‘New Module‘ screen.

1

  • Click on ‘Import Existing project‘ in the list at the bottom of the window and click next.

2

  • In the next window, select where your library is located. After selecting, you can name your module. Then press next.
  • Click on finish and a fresh Gradle Sync will begin.
  • The selected library would have been added as a module into your app. Now we have to make it as a dependency. To achieve this,  go into your app’s Project Structure, click on Dependency tab, click on the plus sign and then on ‘Add Module Dependency‘. In the next window, you should be able to see the added library. Add it, apply the changes and a new Gradle Sync would begin.

3

  • Now, you should be able to see the added library in your App’s build.gradle file as a dependency.

4

Using new GoogleApiClient for receiving Fused Location Updates

Google has deprecated LocationClient and wants us to use GoogleApiClient for receiving Fused Location Updates. This Blog Post will teach you how to do exactly that.

1) Import GooglePlayServices as shown here: 

2) Add necesary permisssions in your manifest:

  • <uses-permission android:name=”android.permission.ACCESS_COARSE_LOCATION” />
  • <uses-permission android:name=”android.permission.ACCESS_FINE_LOCATION” />

3) Create a GoogleApiClient object using GoogleApiClient Builder:

  • mGoogleApiClient = new GoogleApiClient.Builder(this)
    .addApi(LocationServices.API)
    .addConnectionCallbacks(mLocationConnector)
    .addOnConnectionFailedListener(mLocationConnector)
    .build();
    mGoogleApiClient.connect();

4) Implement GoogleApiClient.ConnectionCallbacks, GoogleApiClient.OnConnectionFailedListener and com.google.android.gms.location.LocationListener and override the required methods.

5) Inside the overriden onConnected create a LocationRequest object and call LocationServices.FusedLocationApi.requestLocationUpdates().

See code screenshots for complete code. 

Now you shall start receiving Location Updates.

one_cropped

two_cropped